Torque
New member
.
First the video for anyone who is merely curious, followed by a detailed explanation for those more interested in the project. Note that the image on the phone screen is clearer in real life than how my helmet cam captured it.
[video=youtube;1TtAhhrgU5c]http://www.youtube.com/watch?v=1TtAhhrgU5c[/video]
In the long list of mods to my MT-07 (damn this bike is so mod-able) here is my replacement for the mirrors – a rear view camera. I decided on a Wi-Fi system so that I could use my iPhone as a monitor. The benefits of this method are that there is no need to route any wiring to the handlebars and that the iPhone screen is quite good even in sunlight. In fact in the future I could use either an iPhone or Android device with even better screen technology.
The project was an easy one to carry out and consists of 3 simple parts:
1. Mount the phone on the handlebar
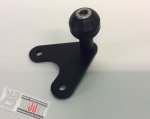
I used the RAM mount system in conjunction with the BRUUDT ball mount for the MT-07.
Here’s the parts list:
BRUUDT mount for MT-07, eBay link BRUUDT Montagekugel f.
RAM double socket arm short, part number RAM-B-201-A.
RAM diamond base to 1” ball, part number RAM-B-238.
RAM mount for iPhone 5, part number RAM-HOL-AP11.
Black plastic blanking plugs for mirror holes, eBay link 4 Black Plastic Blanking End Cap Caps Round Tube Pipe Insert 12.7mm / 1/2" | eBay.
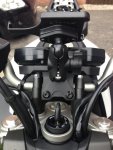
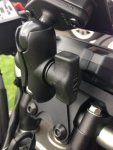
No explanation needed to fit the mounting system as it is all straight-forward. If you want the phone mounted higher up then you can buy the longer RAM arms, either RAM-B-201 or RAM-B-201-C. I preferred the short arm and I’ve deliberately tilted the mount towards the vertical in order to reduce the glare/sky reflection on the phone screen.

2. Wire in the Wi-Fi transmitter
The camera system is Wi-Fi, but rather than a camera with built-in Wi-Fi which is generally bulky, I used a small car reversing camera with composite video output linked to a Wi-Fi transmitter. The transmitter fits under the pillion seat where it can be permanently plugged in to the 12V supply.
The Wi-Fi transmitter can be purchased from eBay or Amazon, here is the eBay link I bought it from Wifi Car Backup Camera Realtime Video Transmitter for iPhone iPad Android 802W | eBay (note this one is from Hong Kong).
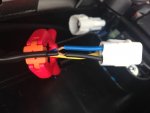
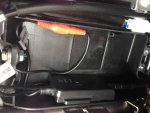
I chose to power the transmitter by splicing into the 12V supply for the rear light (blue and black wires downstream of the 3 pin white connector). I pulled the black sleeve away from the splice area, cut the insulation as shown in the photograph, soldered the wires from the transmitter connector, wrapped electrical tape around the solder joints and pushed the black sleeve back over the wires. The transmitter is mounted on the side with the supplied Velcro pads, and in this position hardly takes up any space.
The transmitter only draws 150mA so no danger of overloading this circuit and the transmitter automatically powers up when the ignition is turned on.
The transmitter has 2 more connections; these are a 12V out for the camera and a video in from the camera. The iPhone app for the live video feed is called WIFI AVIN, just search the App Store. There is also an Android APK available.
3. Mount the camera and commission
I used this camera from eBay Waterproof Wide Night Vision HD Car Reverse Camera/Rear View Parking LED Sensor | eBay. Other types are available but you will need to make sure it flips the image horizontally so that when the camera is pointing backwards, objects on the left will appear on the left on the phone screen. A normal camera will transpose left and right when pointing backwards.
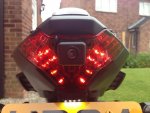
I thought long and hard about the camera position and settled on the rear light cluster. I was going to make a bracket to mount it somehow on the number plate or tail tidy, but in the end I went for the simple approach. The camera is small enough to not interfere with the LED tail light. You can see from the photograph below that the LED pattern is arranged in a V formation such that there is a gap at the top-middle for the camera.
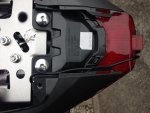
3M double sided tape is enough to hold it in position without resorting to screws and therefore having to modify the light in any way. I did, however, file a very small U shaped channel in the piece of plastic that fits above the rear light and below the pillion seat. You can just see it from the rear-view photograph below. This channel is necessary to route the cable from the camera to the Wi-Fi transmitter.
The cable fits as shown and this ensures that it doesn’t get pinched anywhere because there’s a foam pad in the centre of the piece of plastic I filed which allows for a gap either side of the foam between the plastic and the rear light.
Plug the 2 connectors from the camera to the Wi-Fi transmitter and the system is ready. On your phone you need to change the Wi-Fi settings to connect to the transmitter (it is effectively a Wi-Fi hot spot). You will probably have to do this every time you set off from home as your phone will always re-connect to your saved/favourite networks when your bike is not in use, i.e. it will generally re-connect to your home Wi-Fi router.
Start the AVIN app and you will have a live feed from the camera. The app also allows you to record video or take snap shots of the camera feed.
The view is very clear and surprisingly good even in sunlight. Also no more elbows or shoulders in the way of the rear view. Filtering is easier too without mirrors sticking out. Overall I’m really pleased with how this system has turned out.


First the video for anyone who is merely curious, followed by a detailed explanation for those more interested in the project. Note that the image on the phone screen is clearer in real life than how my helmet cam captured it.
[video=youtube;1TtAhhrgU5c]http://www.youtube.com/watch?v=1TtAhhrgU5c[/video]
In the long list of mods to my MT-07 (damn this bike is so mod-able) here is my replacement for the mirrors – a rear view camera. I decided on a Wi-Fi system so that I could use my iPhone as a monitor. The benefits of this method are that there is no need to route any wiring to the handlebars and that the iPhone screen is quite good even in sunlight. In fact in the future I could use either an iPhone or Android device with even better screen technology.
The project was an easy one to carry out and consists of 3 simple parts:
1. Mount the phone on the handlebar
I used the RAM mount system in conjunction with the BRUUDT ball mount for the MT-07.
Here’s the parts list:
BRUUDT mount for MT-07, eBay link BRUUDT Montagekugel f.
RAM double socket arm short, part number RAM-B-201-A.
RAM diamond base to 1” ball, part number RAM-B-238.
RAM mount for iPhone 5, part number RAM-HOL-AP11.
Black plastic blanking plugs for mirror holes, eBay link 4 Black Plastic Blanking End Cap Caps Round Tube Pipe Insert 12.7mm / 1/2" | eBay.
No explanation needed to fit the mounting system as it is all straight-forward. If you want the phone mounted higher up then you can buy the longer RAM arms, either RAM-B-201 or RAM-B-201-C. I preferred the short arm and I’ve deliberately tilted the mount towards the vertical in order to reduce the glare/sky reflection on the phone screen.
2. Wire in the Wi-Fi transmitter
The camera system is Wi-Fi, but rather than a camera with built-in Wi-Fi which is generally bulky, I used a small car reversing camera with composite video output linked to a Wi-Fi transmitter. The transmitter fits under the pillion seat where it can be permanently plugged in to the 12V supply.
The Wi-Fi transmitter can be purchased from eBay or Amazon, here is the eBay link I bought it from Wifi Car Backup Camera Realtime Video Transmitter for iPhone iPad Android 802W | eBay (note this one is from Hong Kong).
I chose to power the transmitter by splicing into the 12V supply for the rear light (blue and black wires downstream of the 3 pin white connector). I pulled the black sleeve away from the splice area, cut the insulation as shown in the photograph, soldered the wires from the transmitter connector, wrapped electrical tape around the solder joints and pushed the black sleeve back over the wires. The transmitter is mounted on the side with the supplied Velcro pads, and in this position hardly takes up any space.
The transmitter only draws 150mA so no danger of overloading this circuit and the transmitter automatically powers up when the ignition is turned on.
The transmitter has 2 more connections; these are a 12V out for the camera and a video in from the camera. The iPhone app for the live video feed is called WIFI AVIN, just search the App Store. There is also an Android APK available.
3. Mount the camera and commission
I used this camera from eBay Waterproof Wide Night Vision HD Car Reverse Camera/Rear View Parking LED Sensor | eBay. Other types are available but you will need to make sure it flips the image horizontally so that when the camera is pointing backwards, objects on the left will appear on the left on the phone screen. A normal camera will transpose left and right when pointing backwards.
I thought long and hard about the camera position and settled on the rear light cluster. I was going to make a bracket to mount it somehow on the number plate or tail tidy, but in the end I went for the simple approach. The camera is small enough to not interfere with the LED tail light. You can see from the photograph below that the LED pattern is arranged in a V formation such that there is a gap at the top-middle for the camera.
3M double sided tape is enough to hold it in position without resorting to screws and therefore having to modify the light in any way. I did, however, file a very small U shaped channel in the piece of plastic that fits above the rear light and below the pillion seat. You can just see it from the rear-view photograph below. This channel is necessary to route the cable from the camera to the Wi-Fi transmitter.
The cable fits as shown and this ensures that it doesn’t get pinched anywhere because there’s a foam pad in the centre of the piece of plastic I filed which allows for a gap either side of the foam between the plastic and the rear light.
Plug the 2 connectors from the camera to the Wi-Fi transmitter and the system is ready. On your phone you need to change the Wi-Fi settings to connect to the transmitter (it is effectively a Wi-Fi hot spot). You will probably have to do this every time you set off from home as your phone will always re-connect to your saved/favourite networks when your bike is not in use, i.e. it will generally re-connect to your home Wi-Fi router.
Start the AVIN app and you will have a live feed from the camera. The app also allows you to record video or take snap shots of the camera feed.
The view is very clear and surprisingly good even in sunlight. Also no more elbows or shoulders in the way of the rear view. Filtering is easier too without mirrors sticking out. Overall I’m really pleased with how this system has turned out.
 as I'm mainly a fair weather rider.